Storing and Serving Images from Ghost in Amazon S3
As part of my project, Epilocal, I have done a lot of work in the Jamstack space, especially around using Ghost as a headless CMS.
I think there's lots of potential for publishers to use a set-up like Ghost with Gatsby together in order to build blazing fast, modern experiences for their readers. But there are some gotchas to be aware of when you try to take Ghost headless. One of the trickiest parts is what to do with images.
If you use Ghost as an ordinary CMS and let it serve your site, you'll see that all of your images are served from a URL that looks like this: https://YOURGHOSTURL.com/content/images/. This is because your Ghost CMS instance is saving your images in its local storage and serving them from there.
This may be fine under normal circumstances, but when we take Ghost headless this creates a few problems for us:
- Our images will be loading slower than the rest of our site (since they are not served from a CDN)
- Sending requests for images to our Ghost instance will increase our AWS costs or may require us to upgrade to a bigger and more expensive Digital Ocean droplet
- If we wanted to build a site from a local Ghost instance, our images would simply not load
Thankfully, there's a solution out there already: storage adapters that allow you to store all of your Ghost images in Amazon S3. The only issue is that these adapters have not been updated recently and their docs can be difficult to follow in places.
So here's what I did to get an S3 adapter up and running successfully on my Ghost instance.
Choose your adapter (ghost-storage-adapter-s3)
There are two adapters that Ghost recommends using: ghost-storage-adapter-s3 and ghost-s3-compat.
I found ghost-storage-adapter-s3 to be updated more recently, have more exensive installation instructions, and more community discussion on Github issues - so I went with that one.
The rest of these steps will show you how to get it working with Ghost and AWS.
(Note: this works with the latest Ghost version as of time of publishing which is Ghost 4.12)
Set up your S3 bucket
This is where the installation instructions went a little bit off track for me. They recommend creating an S3 bucket, using it for static hosting and attaching a bucket policy manually to it. But following the instructions here gave me AWS errors. (specifically, the bucket policy in the instructions contains 'GetBucket' which appears to be an invalid AWS action)
Instead, what worked for me was to simply create an S3 bucket with no static site hosting.
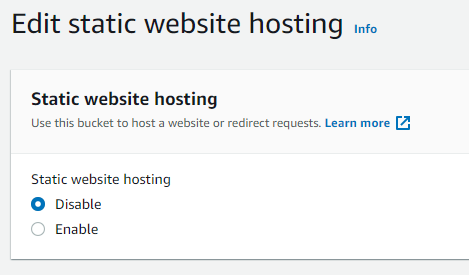
Then rather than manually creating a bucket policy, I left it blank. We will use Cloudfront to do that automatically for us in the next step.
Set up Cloudfront
Next, I set up a new Cloudfront distribution where I selected my new S3 bucket from the Origin Domain drop-down.
The important step for the Cloudfront configuration is to ensure that you use OAI identity, create a new OAI identity and select "Yes, update the bucket policy":
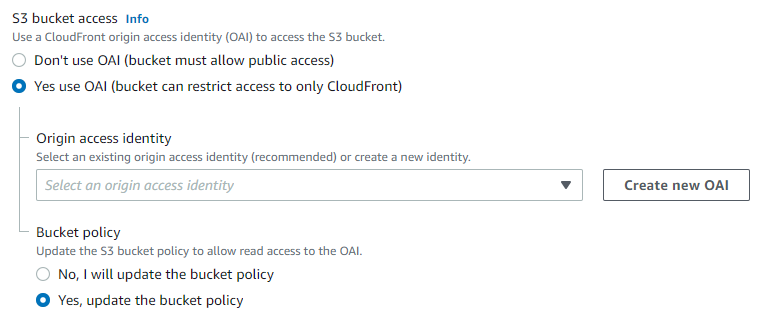
This creates the S3 bucket policy automatically and ensures that your S3 bucket is only served through your Cloudfront distribution.
Add IAM user for Ghost programatic access
Now that we have our S3 bucket and Cloudfront distribution, the next step is to give Ghost the ability to access our S3 bucket in order to upload images. For this step, the instructions worked perfectly fine, but to sum up you should create a new IAM user with programatic access and create this policy:
{
    "Version": "2012-10-17",
    "Statement": [
        {
            "Sid": "VisualEditor0",
            "Effect": "Allow",
            "Action": "s3:ListBucket",
            "Resource": "arn:aws:s3:::ghost-bucket"
        },
        {
            "Sid": "VisualEditor1",
            "Effect": "Allow",
            "Action": [
                "s3:PutObject",
                "s3:GetObject",
                "s3:PutObjectVersionAcl",
                "s3:DeleteObject",
                "s3:PutObjectAcl"
            ],
            "Resource": "arn:aws:s3:::ghost-bucket/*"
        }
    ]
}
Replace "ghost-bucket" with your own S3 bucket name.
Edit your Ghost config file
Now with all of the AWS steps done, we just need to update the Ghost config file, which can be found in the root directory of your Ghost install directory and will be either: ghost.development.json or ghost.production.json depending on which environment you're currently running.
In this file, we add the following:
...
"storage": {
    "active": "s3",
    "s3": {
      "accessKeyId": "[key]",
      "secretAccessKey": "[secret]",
      "region": "[region]",
      "bucket": "[bucket]",
      "assetHost": "https://[subdomain].example.com", // cloudfront
      "forcePathStyle": true,
      "acl": "private"
    }
  }
...
Hat tip to apavamontri who commented on this Github issue with a very helpful response.
Here you replace accessKeyId and secretAccessKey with the values from your IAM setup. Then you will replace your region and bucket with the region and bucket name of your S3 bucket. Finally, you will replace assetHost with the URL of your Cloudfront distribution.
Conclusion
And with that, you are all set-up to store your Ghost images on Amazon S3. Note, that this will not migrate images you've already uploaded on Ghost to S3. Instead, it will just start saving any new images you upload to Ghost in S3 from now on.

